Saturday, November 7, 2015

November Challenge with Clique Kits

So excited the November Challenge is live over at


Supplies: Clique Kits November Kit 2015


You can use the glassine bags that come in your kit on your pages, and I loved adding punched leaves inside this one!! The feathers are one of the several exclusive November Cut Files from Clique Kits! Totally love these feathers!! I cut a shadow out in white card stock, and then used the patterned papers from the kit to cut out the top layer of feathers! Love that these are layered files that you can use in so many ways! Since they are PNG and JPEG files you can print them out as well!


Crushing on the navy papers in this kit!! Such a gorgeous line from WeRMemory Keepers.


Here is the sketch for November from Amanda O'Banion at Clique Kits


 Would love for you to play along with us for the November Challenge!
The guidelines are:

  • You may combine our challenge with other challenges
  • You may enter our challenge up to 3 times
  • Link up your projects by November 30th, 11:55 pm CST
  • You are not required to use a Clique Kit or the sketch to link up
  • Create any type of project
  • Link directly to your challenge project entry post

Link to the Clique Kits November Challenge Blog post:


Have fun!
Artful Leigh

Wednesday, November 4, 2015

Project Life Week 43 Using the New Everyday Edition!

Love the new Everyday Edition of Project Life®!
It's a beautiful, minimal design that is clean and fresh!


 Week 43 Supplies: all Project Life Everyday Edition, and one embellishment from the Shoppe @TurquoiseAvenue.com


The left page is Design E by Becky Higgins LLC, with room for four 6x6 photos, and it is such a great pocket page that makes a big impact! Added my text in Adobe Photoshop before printing at home on 8.5x11 Canon Photo Plus Glossy Two paper.


The right side is Design A by Becky Higgins LLC. Ran the journaling cards through my printer after making a text box in Pages to fit the cards. Love that black and white 3x4 card with the days of the week, oh I love this whole edition! It's got gorgeous colors that just seem to go with your photos!


Thank you for visiting!
If you have any questions about Project Life® and how to get started (it's so totally simple),
visit www.BeckyHiggins.com for more info!


Hugs,
Artful Leigh Creative

Monday, November 2, 2015

Project Life 2015 Week 42

Week 42 features my sub to Studio Calico Monthly Project Life® Kit.
Keeping it simple.


Week 42 supplies: Project Life kit; Studio Calico October kit (called Wink, Wink), translucent letter stickers; Just Add Color Project Life kit (HSN Exclusive), digital stamps/ word art on photos; Kellie Stamps Digital set " I am, You are, We are" 


I simply added the translucent heart over the week 42 title card, stitched with my sewing machine, and added the stickers.  Measured the cards I wanted to add journaling to, and used Pages on my Mac to print directly on the PL cards. Simple and done!


Thank you for visiting this week in Project Life® album 2015,
by Artful Leigh Creative

Sunday, November 1, 2015

Ten Creative Ways To Use Digital Stamps: Idea 4


Hello Friends!
This week we will look at idea number four.
White It Out.


Idea #4: WHITE IT OUT


One of the great things about using digital stamps, is that you don't have to buy every color of ink pad to use them, and I think it's a lot simpler to create white text with a digital stamp. I have tried several ink pads, but none of them gave me the crisp clean result of white digital stamps!


Supplies: Kellie Stamps Digital "I AM, You Are, We Are" set, and Studio Calico Project Life kit for October (Wink, Wink is the name) and letter stickers from the Project Life HSN kit "Just Add Color"

For this Week 42 Project Life® page, I used the Kellie Stamps digital set " I am, You are, We are" for the text on the top right photo "Liking". 

Step One:In Photoshop I simply go to File> Open> select desired digital stamp> Double Click To Open.
Step Two: Click on the stamp image in Photoshop to select it. In the Layers palette on the right, click and drag your digital stamp onto your project or photo. Then in the top header bar (with your digital stamp selected) go to Image>Hue/Saturation>and on the slider bar slide the lightness all the way to white. 

The courses I have completed this year in Adobe Photoshop, and Adobe Illustrator, have taught me that you use white text if your background is colored, and black text only if your background is white or very light. In other words, always use white text over a color, as in the Studio Calico Project Life® 3x4 cards above. That's super easy with digital stamps!!


Thank you for joining me today for this tip on the advantage of using digital stamps to "White It Out"!

Hugs, Artful Leigh


Wednesday, October 28, 2015

2015 Craft Room Tour by Artful Leigh Creative for Clique Kits

Welcome to the Share Your Space feature for Clique Kits!!
2015 Artful Leigh Creative Craft Room Tour!


An overview of the room from the doorway . The room is above the garage, and measures 13 feet by 19 feet. I waited 11 years to turn this space into a craft room, and once the youngest started high school, we decided they didn’t need the play room anymore:)  Hubby had the idea to rip out the carpet, and replace it with laminate. He knows me pretty well after 21 years, and since I am pretty klutzy, I had definitely dropped an ink pad or two upside down on the carpet before! :) Love having this floor that is so easy to clean.

I made the standing height craft table in the center of the room, and have a detailed tutorial on my blog.  It’s made of 3/4 inch Birch Plywood , and I hand finished the stain with a staining cloth and Minwax Bombay Mahogany stain.  This table is 4 feet wide and 6 feet long, and has a 48 inch clearance all the way around for traffic flow. The bases are from Wal-Mart.com and the openings fit the 14×14 inch Itso Bins from Target.

I also used a hand saw and miter box to make the frame for the pegboard, and spray painted and hung it all by myself as well. Hubby calls me “Bob the Builder”! Hee hee There’s  a detailed tutorial for the pegboard also.


We will start here on the left side of the room. The two tall bookcases were repurposed from another room in the house, and I painted them with Antique White paint, color matched to the Antique White Bedford Desk units in this room. The first one on the left holds patterned paper sorted by manufacturer. Some of the paper holders I repurposed from those Priority Mail medium boxes that your scrap purchases come in. Painted, and covered with paper to match my room and the Target Itso Bins are in use here to hold larger amounts of patterned paper by manufacturer. The middle units are from Michael’s and an old entry bench I repainted, to hold card stock sorted by color. The right bookcase holds embellishments sorted by manufacturer.


On top I like to display some of the mini albums I’ve made and my kid’s photos.


The next bookcase holds My Project Life® albums, Core Kits, Inspiration and sketch books, and American Crafts White Card Stock, all purchased at 40% off or more with extra coupons. The rolling cart next to the bookcase holds Project Life® cards  sorted by color and kit. I have a tutorial on that one too!


That first little brown basket on the counter holds Project Life® Theme Kits, some mini albums hang on the dress form, and you can see the Bedford Modular Desk Units from Pottery Barn. They were my one splurge in the room since I repurposed, made, or thrifted the rest of the furniture.


The Silhouette Cameo, sewing machine, and Mac computer are next in this area where I blog, edit and print photos. The Tiffany Blue file folders on the wall, and paper sorters, are by Martha Stewart for Staples. The wall quilt is by my Mom, and my sister painted the mixed media art above it. My grandma paints as well, we are all very crafty in my family:) The pegboard wall holds mostly American Crafts supplies, and was inspired by Heidi Swapp’s wall in her craft room, love the stripes! It sits above the Planner Station.  I sewed the pillows and curtains from fabric by Basic Grey for Moda Fabrics.


You can see the whiteboard behind my Mac, which I use to keep Design Team assignments in plain view. Kit embellishments sorted by color are on the wall along with my most used punches in the Target Dollar Spot pails. That weathered gray wall organizer is also from Target, and holds enamel dots, die cuts, black pens, pencils, and glue dots, and punches. To the right of the Mac is a magazine holder that I store my Design Team layouts in until I can file/photograph them and put them in albums. The file folders to the right of there, hold tips for Adobe Photoshop, Lightroom, Silhouette tips, and Neenah Solar White Card Stock for printing the Clique Kits exclusive printables included each month, and any other printables.


More Project Life® cards and Studio Calico Kits, and the “Create” word is from Heidi Swapp Hello Signature Wall Art. I have a couple more pieces to paint and hang in here as well. Love them! I got the wall organizer at Lowes, and it is for holding CD's.


Here at the planner station, you can see my completed Week In The Life™ and #Myselfiescrapbook 6×8 albums, and my little West Elm succulent plant just makes me happy in that gold dot container! More Target Dollar Spot buckets hold different journaling and planner pens that I use here. In Design School we learned to store items at their point of use, for the most efficient room design. I tried to employ that technique throughout the room. Where do I use an item? Then incorporate storage there.


A close up of my different planners and full size Minc Machine I got on sale!!


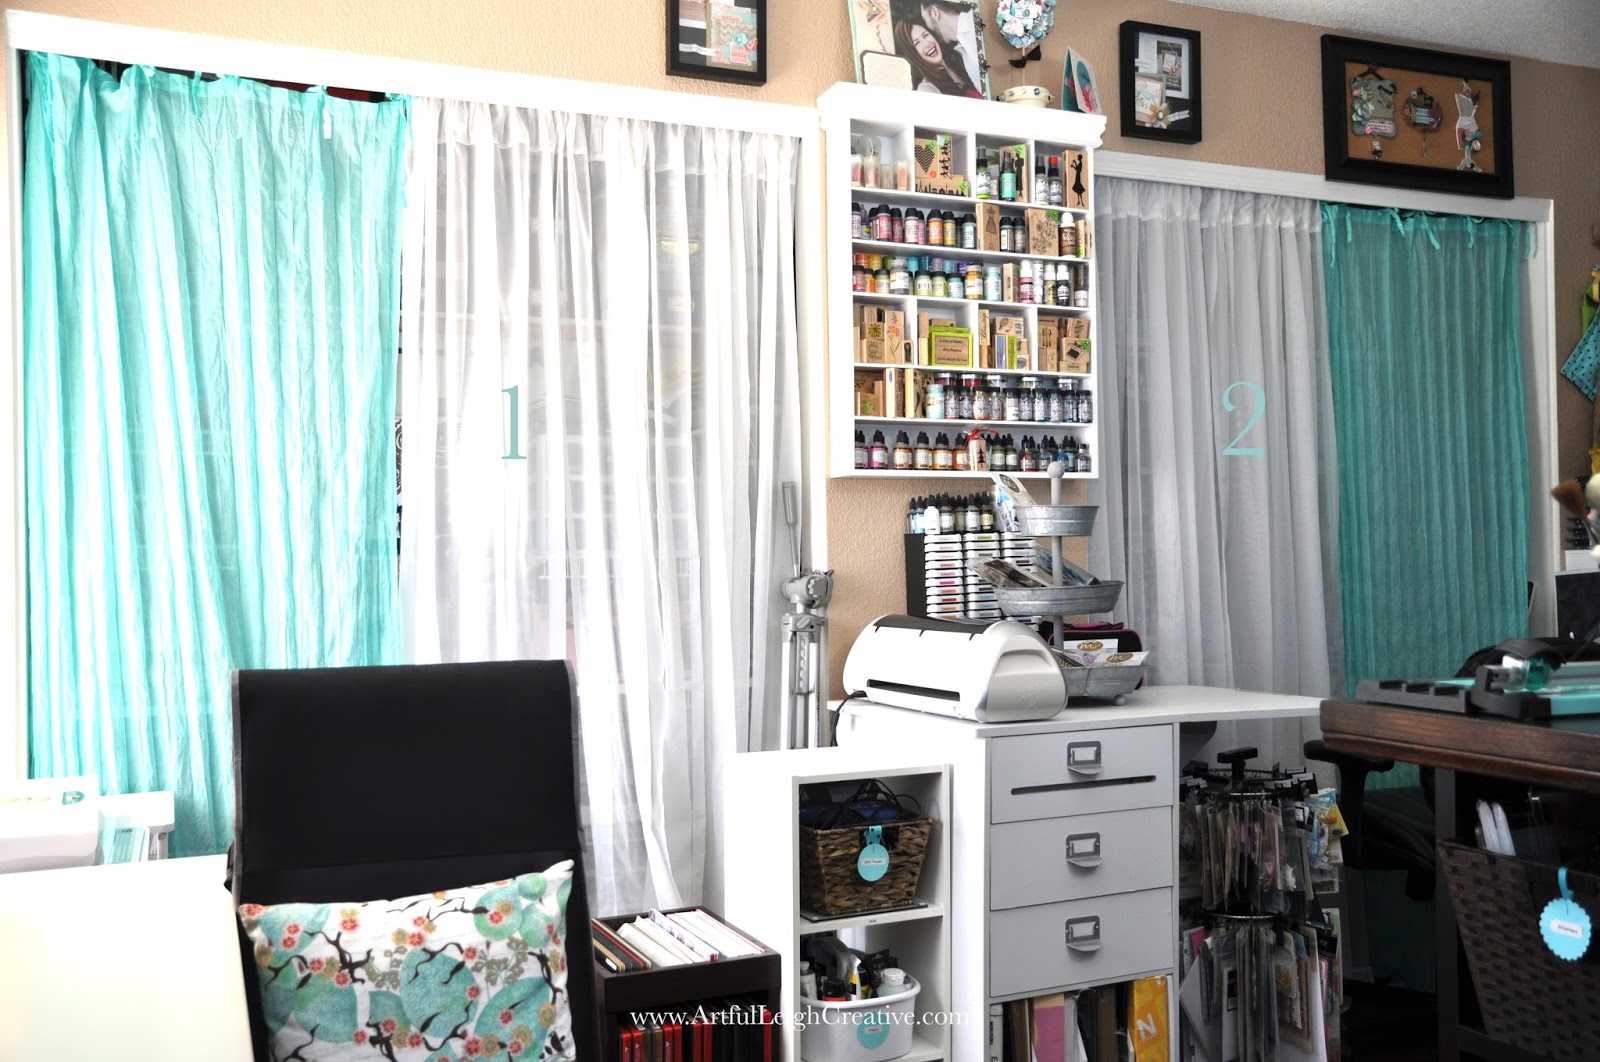
Here you can see the cabinet my sister sent to me, on the floor that holds Sizzix dies. I stained it to match the floor and the craft table. Love it Sis! Next to that are my Cricut Machine and a Clip It Up  spinning organizer for rarely used embellishments. Behind curtain one on the left is the Die Cut Station. Behind curtain two is the Stamping Station.


Curtains open on the Die Cut Station. Dies, embossing folders, letterpress plates, and materials to cut are here. I have baskets with Fun Foam, Acetate, and repurposed chipboard labeled for use. Photos organized by year and month are above. I made sure to have LED lights so they are archival safe and don’t emit UV light.


Stamping closet holds all stamps, pads and reinkers, Distress Inks, Alcohol Inks, and mists. Basically anything that could be messy, is in here:) Masks are hanging from a recycled cafe rod. I had installed this pegboard that the home improvement store cut for me. It’s so inexpensive and a great way to organize lots of things. I used chipboard from packaging to hold the small ink pads, reinkers, and other stuff. Simply laid the chipboard on the flat peg board hooks.


Close up of the stuff I keep close at hand on the standing height craft table. Kellie Stamps, Studio Calico Stamps, Heidi Swapp Color Shine, spinning tool caddy, and more.


2015 Craft Room Tour Video on You-tube!!!!


Thank you so much for joining me on this long craft room post!


LINKS:
CRAFT TABLE 
http://www.artfulleighcreative.com/2013/09/diy-craft-table-tutorial.html

5 EASY STEPS TO ORGANIZE PROJECT LIFE CARDS BY KIT AND COLOR
http://www.artfulleighcreative.com/2015/01/5-easy-steps-to-organize-project-life.html

PEGBOARD DIY CRAFT ROOM ORGANIZATION
http://www.artfulleighcreative.com/2015/09/craft-room-organization-heidi-swapp.html


Thank you to Clique Kits for featuring my space and allowing me to share!!

Hugs,
Artful Leigh


Sunday, October 25, 2015

Ten Creative Ways To Use Digital Stamps, Idea Three


Thanks for joining me today, for the third post in this series. 


IDEA #3: CAPTION IT!

For this week's post, we are focusing on ways to use your digital stamps, or PNG files as captions. 


 SUPPLIES: Kellie Stamps Digital sets, "Kiddo",  Project Life® Core Kit: Heidi Swapp Prismatic, wood veneer: Pinkfresh Studios from Clique Kits. I created captions with the "So Proud" Kellie Stamp, and the "You're Awesome". 


You can create your own caption at the top of a blank 3x4  (or any size you want!) card and leave space for journaling. I created this card in Adobe Photoshop, but any program that allows you to import PNG or JPEG files will work. I simply add shapes and color them in with the eyedropper tool in Photoshop, like the two triangles above. I  clicked the eyedropper on my son's shirt, and got the magenta color that coordinated with the Heidi Swapp Prismatic Project Life® cards. The possibilities are endless, and you are only limited by the number of shapes you can imagine. 

If you don't have any journaling, but need a filler card, you can move the shape with the digital stamp to the center of the card. Move it anywhere you like, that's the beauty of digital stamps!  Click Edit, or undo and try again! 


You can also use digital stamps to create captions on your photos. I like to place them in the blurry background, as I did here with the Kellie Stamps Digital "Kiddo" set. You can draw attention to a specific feature in the photo by your placement. Here, attention is focused on her eye by lining the stamp up with her eyes. 


Try out some digital stamping , and creating journaling or filler cards with your digital supplies. It definitely adds to your crafty arsenal and makes your supplies stretch farther.


Thank you for joining me today!
Hugs,
Artful Leigh


Friday, October 23, 2015

Clique Kits October 2015 Kit Layout Number Eight! You-tube video too!

It's FRI-YAY video day!

Wow! I have made my eighth layout with this kit and still have 3 patterned papers and lots of embellishments to make more!! 
There is a happy little process video below on this layout as well.


All papers punched from the October Clique Kit Funfetti #Pinkfresh Studio papers: A good way to use up small pieces you have left over.


This is based on the Studio Calico October 18th Sunday Sketch, they have a free one every Sunday!!


Thanks for watching the video, please comment and subscribe if you will! 


Hugs,
Artful Leigh Creative