Showing posts with label Artful Leigh Creative. Show all posts

Wednesday, June 29, 2016

Free Hand Painted PrintablePDF for #LittleSummerJOY from Artful Leigh


I turned my hand painted paper into a free printable for you guys to use and enjoy
inspired by the #LittleSummerJOY class!


This PDF is sized to fit regular TN, and you can download it and print out at 100% size and Best Quality.  You can get both versions, one a full page floral and the other is as shown above with the title for a title page!


For the Title Page CLICK HERE


Click here for FULL PAGE FLORAL 


Remember to sign up using my link and enter code SAVE5 to save $5 before June30th!!!


Link to the class here:

http://little-paper-projects.teachable.com/?affcode=35508_gb-ffila


This post contains affiliate links which don't increase your price but give me a little to keep my crafty posts coming to you! 


Monday, June 27, 2016

Contributing Designer for #LittleSummerJOY 2016 Class

I am SUPER excited to be contributing to this year's #LittleSummerJOY class
because I totally enjoyed it last year as a student and learned a lot!


Here is a little info from LittlePaperProjects:
This year, we are complimenting the free prompts and inspirational albums with a paid course all about finding joy and using our favorite Traveler's Notebook techniques. We are SO proud of it and SO super excited for the content this year. And we can't wait to share it with you. 


and guess what friends??? I have a unique URL and a discount code for you to use that will save you $5 off the paid course!!!


USE CODE SAVE5 and follow this link to the class


Visit the LittlePaperProjects Blog to view tons of info about this class, and sign up before the code expires on June 30th! and click on the yellow bar there that says  Learn More + Sign up Today! 


Hugs, 
Leigh


Wednesday, April 13, 2016

Project Life® Creative Team 2016 Share

It's that time of the month again to share some inspiration from the 
Project Life® Creative Team 2016!
I am enjoying this year on the Physical Team, 
meaning using the physical products from Project Life® 
and that makes the fourth year documenting our family 
with this super easy system.
Seriously so easy!


This is Week 7: Currently Edition Core Kit, Currently Chipboard frames, and @FeedYourCraft on Etsy mini flair for Valentine's Day. 


Hubby commented yesterday, while perusing our older Project Life® books, that he can't believe how much better my photos are now than they were when I started documenting with PL. four years ago! 
That's quite a complement, considering he is not a detail person at all! Ha! I think it is in the daily documenting practice that improvement comes, as with anything. So, if you haven't yet, start today and you will be amazed at all the details of your family life you can capture and record with Project Life®.


Visit BeckyHiggins.com for more from the other members on the team and info on Project Life®

Thursday, January 14, 2016

#ProjectLifeCreativeTeam2016 First Creative Team Post

Super excited to share my first Project Life® Creative Team 2016 layouts!


Title Page for 2016 Family Album: Project Life® Everyday Edition, Becky Higgins LLC. Photo Pocket Pages Design F, Kellie Stamps Digital "New Year 2016" set, American Crafts Thickers


Week One January: Project Life® Everyday Edition, Everyday Edition Stickers, and Becky Higgins LLC. Photo Pocket Pages Design A, (Happy New Year: napkin from Target)


Simply used a 4x6 Project Life® card as a template to cut the napkin from Target! Love that the pockets of your PL pages can hold ephemera, and they are separated from the photos, so you can place anything in the pockets without worry of non-archival items touching your photos!!  LOVE!


The kids even save ephemera and ask, "Do you want this for your Project Life® book?" Why yes, I do! 


Thank you for visiting today!
For more inspiration from the rest of the 2016 Project Life® Creative Team,


hugs, 
Leigh


Wednesday, January 6, 2016

2016 Planners: Set up and Use by Artful Leigh Creative

For 2016 I am using Four Planners.
This is the set up and functionality of each one.


Planning Station in my Craft Room.


Planners above from left to right: 1) Gold Kikki K. A5 planner with Webster's Pages inserts for 2016. Family planner, will show insides at a later date.
2) Light Pink Webster's Color Crush A2 Planner, I am on four CreativeTeams for 2016 (one not revealed yet) so this planner is strictly for tracking all the Design Team assignments, contacts, ideas and such.
3) Webster's Craft Mate Folio, in gray, for favorite planner pens and stickers. Not a planner,  but it's in the above photo, so didn't want to confuse anyone. 
4) Moleskine Notebook, and Leather Traveler's Notebook from Amazon,  for Bible Study, and faith and inspiration.
5) Blush 8.5x11 Sugar*Paper Los Angeles from Target. Used solely for Project Life® journaling and photo note taking.


Creative Team Planner, with the 2016 week on two page,  monthly, and Inspiration file tabs and inserts from Webster's Pages as well.  Page flags from Target, and Project Life® Cards. Webster's Pages Color Crush Planner Charms in teal. :) Totally LOVE this one!


Traveler's Notebook from Amazon, you can just do a search and TONS come up! I wanted a flexible leather cover, so just search for the features you are looking for. Neat and Tangled Stamps for the front cover ( thank you to my littlest sister for the Christmas Present!) 


The first Moleskine has weekly undated pages and I am using this for my 3G's. Yeah, I made it up! Goals, Grace, and Gratitude. Those two pens pictured are what I use in here. Second moleskine has blank  pages for doodles, and inspiration. Third has kraft pages but I am replacing it with grid pages for lettering practice. As you can see I need lots more practice on my lettering!


  Dedicated Project Life® Planner was super cheap at Target, but I have been using this system I created for going on three years now. It is a BIG help for journaling on your Project Life pages and helps me keep track of photos, visualize how many and where the photos are stored, and remember what happened on any given day! Photos are listed at the top of each day. The © means a photo on my Nikon Camera DSLR, and the P means a photo on my phone:) Just helps me keep track!


 These planner charms from Webster's Pages, and the line up of planners just makes me happy! Love to look at them while I am up here creating!! 


Thank you for joining me on this long post, and comment below if you have any questions. 
Hugs,
Artful Leigh Creative 


Wednesday, October 28, 2015

2015 Craft Room Tour by Artful Leigh Creative for Clique Kits

Welcome to the Share Your Space feature for Clique Kits!!
2015 Artful Leigh Creative Craft Room Tour!


An overview of the room from the doorway . The room is above the garage, and measures 13 feet by 19 feet. I waited 11 years to turn this space into a craft room, and once the youngest started high school, we decided they didn’t need the play room anymore:)  Hubby had the idea to rip out the carpet, and replace it with laminate. He knows me pretty well after 21 years, and since I am pretty klutzy, I had definitely dropped an ink pad or two upside down on the carpet before! :) Love having this floor that is so easy to clean.

I made the standing height craft table in the center of the room, and have a detailed tutorial on my blog.  It’s made of 3/4 inch Birch Plywood , and I hand finished the stain with a staining cloth and Minwax Bombay Mahogany stain.  This table is 4 feet wide and 6 feet long, and has a 48 inch clearance all the way around for traffic flow. The bases are from Wal-Mart.com and the openings fit the 14×14 inch Itso Bins from Target.

I also used a hand saw and miter box to make the frame for the pegboard, and spray painted and hung it all by myself as well. Hubby calls me “Bob the Builder”! Hee hee There’s  a detailed tutorial for the pegboard also.


We will start here on the left side of the room. The two tall bookcases were repurposed from another room in the house, and I painted them with Antique White paint, color matched to the Antique White Bedford Desk units in this room. The first one on the left holds patterned paper sorted by manufacturer. Some of the paper holders I repurposed from those Priority Mail medium boxes that your scrap purchases come in. Painted, and covered with paper to match my room and the Target Itso Bins are in use here to hold larger amounts of patterned paper by manufacturer. The middle units are from Michael’s and an old entry bench I repainted, to hold card stock sorted by color. The right bookcase holds embellishments sorted by manufacturer.


On top I like to display some of the mini albums I’ve made and my kid’s photos.


The next bookcase holds My Project Life® albums, Core Kits, Inspiration and sketch books, and American Crafts White Card Stock, all purchased at 40% off or more with extra coupons. The rolling cart next to the bookcase holds Project Life® cards  sorted by color and kit. I have a tutorial on that one too!


That first little brown basket on the counter holds Project Life® Theme Kits, some mini albums hang on the dress form, and you can see the Bedford Modular Desk Units from Pottery Barn. They were my one splurge in the room since I repurposed, made, or thrifted the rest of the furniture.


The Silhouette Cameo, sewing machine, and Mac computer are next in this area where I blog, edit and print photos. The Tiffany Blue file folders on the wall, and paper sorters, are by Martha Stewart for Staples. The wall quilt is by my Mom, and my sister painted the mixed media art above it. My grandma paints as well, we are all very crafty in my family:) The pegboard wall holds mostly American Crafts supplies, and was inspired by Heidi Swapp’s wall in her craft room, love the stripes! It sits above the Planner Station.  I sewed the pillows and curtains from fabric by Basic Grey for Moda Fabrics.


You can see the whiteboard behind my Mac, which I use to keep Design Team assignments in plain view. Kit embellishments sorted by color are on the wall along with my most used punches in the Target Dollar Spot pails. That weathered gray wall organizer is also from Target, and holds enamel dots, die cuts, black pens, pencils, and glue dots, and punches. To the right of the Mac is a magazine holder that I store my Design Team layouts in until I can file/photograph them and put them in albums. The file folders to the right of there, hold tips for Adobe Photoshop, Lightroom, Silhouette tips, and Neenah Solar White Card Stock for printing the Clique Kits exclusive printables included each month, and any other printables.


More Project Life® cards and Studio Calico Kits, and the “Create” word is from Heidi Swapp Hello Signature Wall Art. I have a couple more pieces to paint and hang in here as well. Love them! I got the wall organizer at Lowes, and it is for holding CD's.


Here at the planner station, you can see my completed Week In The Life™ and #Myselfiescrapbook 6×8 albums, and my little West Elm succulent plant just makes me happy in that gold dot container! More Target Dollar Spot buckets hold different journaling and planner pens that I use here. In Design School we learned to store items at their point of use, for the most efficient room design. I tried to employ that technique throughout the room. Where do I use an item? Then incorporate storage there.


A close up of my different planners and full size Minc Machine I got on sale!!


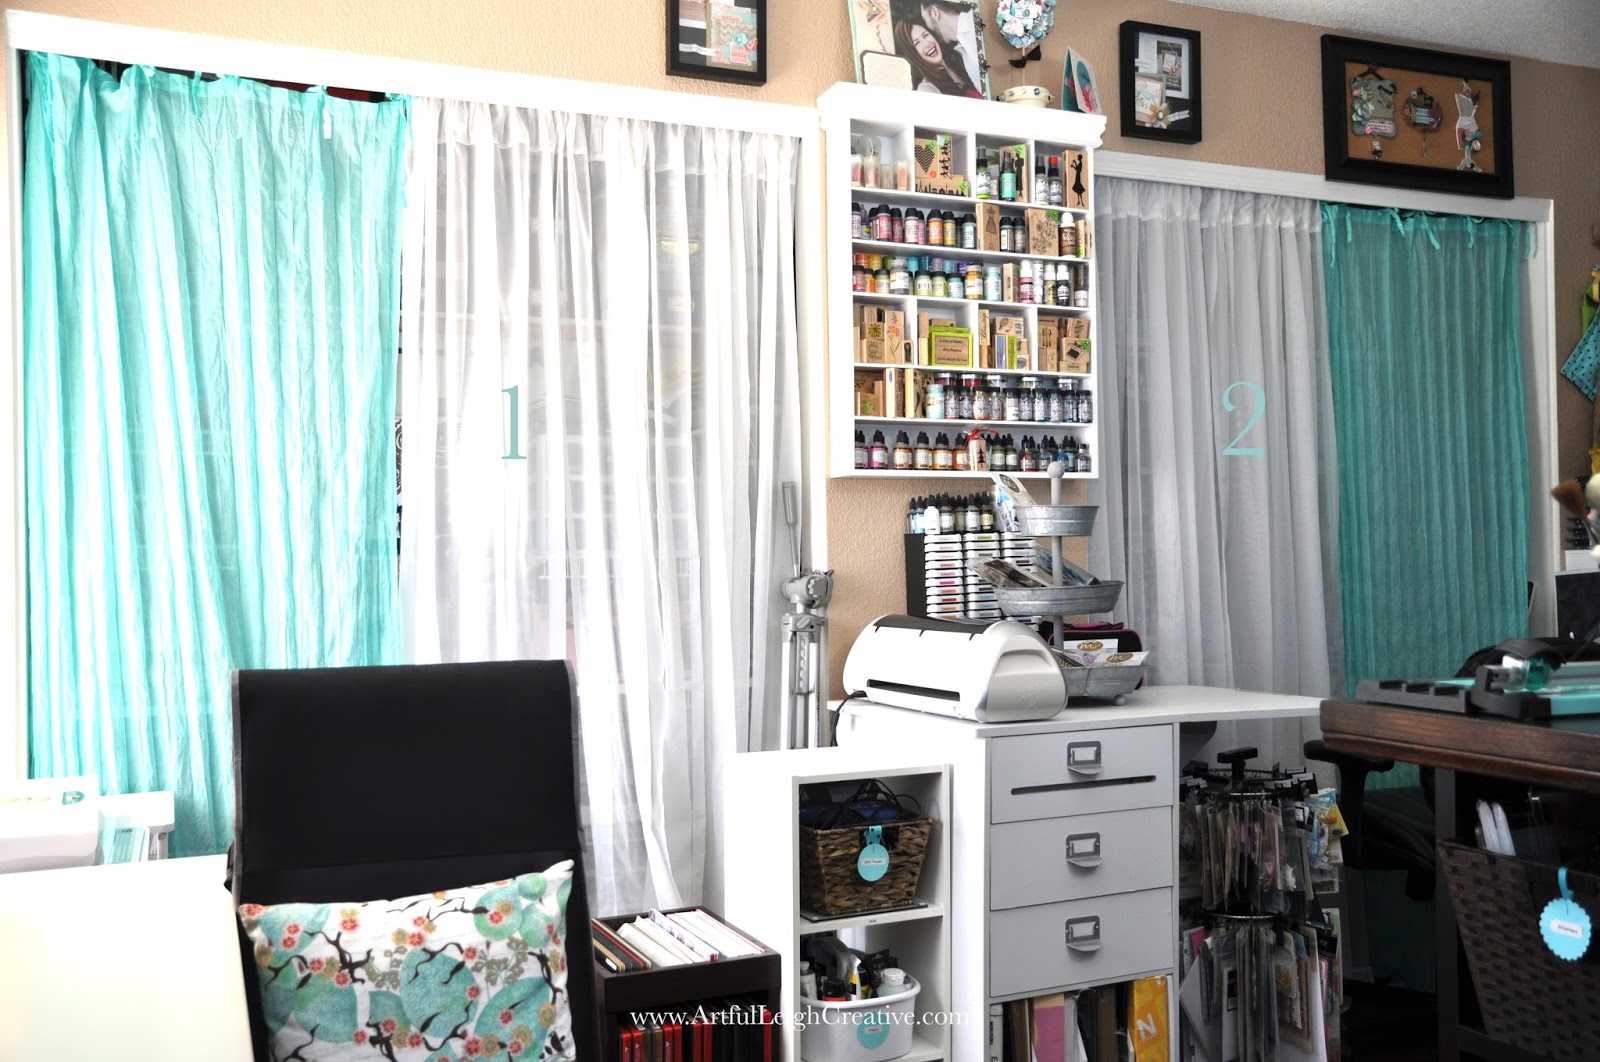
Here you can see the cabinet my sister sent to me, on the floor that holds Sizzix dies. I stained it to match the floor and the craft table. Love it Sis! Next to that are my Cricut Machine and a Clip It Up  spinning organizer for rarely used embellishments. Behind curtain one on the left is the Die Cut Station. Behind curtain two is the Stamping Station.


Curtains open on the Die Cut Station. Dies, embossing folders, letterpress plates, and materials to cut are here. I have baskets with Fun Foam, Acetate, and repurposed chipboard labeled for use. Photos organized by year and month are above. I made sure to have LED lights so they are archival safe and don’t emit UV light.


Stamping closet holds all stamps, pads and reinkers, Distress Inks, Alcohol Inks, and mists. Basically anything that could be messy, is in here:) Masks are hanging from a recycled cafe rod. I had installed this pegboard that the home improvement store cut for me. It’s so inexpensive and a great way to organize lots of things. I used chipboard from packaging to hold the small ink pads, reinkers, and other stuff. Simply laid the chipboard on the flat peg board hooks.


Close up of the stuff I keep close at hand on the standing height craft table. Kellie Stamps, Studio Calico Stamps, Heidi Swapp Color Shine, spinning tool caddy, and more.


2015 Craft Room Tour Video on You-tube!!!!


Thank you so much for joining me on this long craft room post!


LINKS:
CRAFT TABLE 
http://www.artfulleighcreative.com/2013/09/diy-craft-table-tutorial.html

5 EASY STEPS TO ORGANIZE PROJECT LIFE CARDS BY KIT AND COLOR
http://www.artfulleighcreative.com/2015/01/5-easy-steps-to-organize-project-life.html

PEGBOARD DIY CRAFT ROOM ORGANIZATION
http://www.artfulleighcreative.com/2015/09/craft-room-organization-heidi-swapp.html


Thank you to Clique Kits for featuring my space and allowing me to share!!

Hugs,
Artful Leigh


Friday, October 16, 2015

Completed Week In The Life™ 2015 You-tube Video

Yes, doing a happy dance! 
My video is LIVE now!! 


It's complete!! A big HUGE thank you to Ali Edwards for this amazing project, free prompts, and encouragement! I can't even begin to tell you how much I treasure this completed album! It captures in detail the last week of our summer, and one of the last weeks our son lived at home ( he moved out to his first college apartment!) While it was emotionally difficult, the journaling, photos, and memories were cathartic. The focused and deliberate recording of these moments helped me through. Thank you to the #WeekInTheLife FB group as well!!  


All links are in the DESCRIPTION BOX on the You-tube video! :)
but here's a link to Ali Edwards
cause she rocks!


Click on the image to view


Thank you so much for joining me!
Hugs,
Artful Leigh Creative

Tuesday, October 6, 2015

Clique Kits "I Love This Girl" Layout Using Exclusive Cut Files

 Hello Friends! Leigh here, to highlight the exclusive digital cut files
from Clique Kits October Funfetti Kit.


This 8.5x11 layout's main focal point is the geometric cut file, an exclusive cut file that's included in your kit at Clique Kits. Love that!


This is the cut file I used, it's one of the many cut files you get each month.


Here's a close up the embellishments at the top of the page. Pinkfresh Studio wood veneer, and puffy stickers,  love these.


The #PinkfreshStudio wood veneer is perfect for bringing attention to the photos. The glassine bags from your kit, are used here to hold confetti, punched pieces, and the title.


Layout made with the Clique Kits October Funfetti kit.


Thank you for visiting, 
hugs,
Arftul Leigh


Sunday, October 4, 2015

Ten Creative Ways To Use Digital Stamps: New Blog Series Every Sunday

I thought it would be fun to start a new blog series here every Sunday!
Featuring #KellieStamps by Kellie Winnell! 


 Week One: Punch it!

This is going to be a creative series to help you find new ways to use your digital stamps. We will be focusing on the different techniques each Sunday using Kellie Stamps.


Don't you love that you can create any size, color, and orientation with digital stamps? I still stamp in person, but I love adding this set of skills to the crafty bag!


As you can see above in the photo, adding foam tape under your punched piece really makes it a focal point of the card, and gives you that true hybrid scrapbooking result. You can really create any card for pocket scrapbooking, like Project Life®, or scrapbooking you would like.


I have created a free printable pdf for you with the steps, you can download it here:


Thursday, October 1, 2015

Clique Kits Meet The New Team Blog Hop

Hello Blog Hoppers! 
I am so excited to have you all here and joining us today!
Thank you so much for taking the time to hop with us!


There is also a chance to win the gift prize from Clique Kits
so don't forget to comment on all the blogs,
and get you some freebies down below!


Loving this paper from Pinkfresh Studio (#PFRC200115F-Dream Big / Geo Stripe) so wanted to showcase it by repeating the circles and triangles from this awesome modern geometric! 


Stitched down the acetate pieces with my sewing machine.


The puffy stickers, flat sequins, and flair from the October Funfetti Kit from Clique Kits add variety and interest to the embellishment cluster here.


Here's a little something about Leigh: 
Leigh is a wife and blessed Mom, with a degree in Design. She has  been an artist her whole life, and since finding Project Life® in 2013, has become an avid Project Lifer. Her perfect world would have time for painting, paper crafting, movie marathons with her family, beach picnics, and running: all in between cups of coffee and tea! This year, Leigh has completed courses in Adobe Photoshop, and Adobe Illustrator. She loves to encourage everyone she meets to be the photographer, and author of their own family story. She is completely excited and honored to be a part of Clique Kits Varsity Team for 2015-2016! She can't wait to see what you create with your Clique Kits!


I created this free sketch for you! Download here


I created these for you to download free! [Here] The ones you download don't have the watermark, but please remember they are for personal use only.  These are 6"x4" so you can easily print them on 4x6 matte photo paper, matte presentation paper or textured card stock. Just make sure its actually 6 inches wide, because I found out the hard way that if your paper is shorter, it will cut off the first white card and your fall leaves and hexi won't be in the center--- HA!


Here's the hop line up in case you get lost along the way:)


Thank you, God bless,  and remember to have fun friends!
Artful Leigh Creative


Saturday, September 26, 2015

First Week of Design Team: Recap and Sneak Peeks

Well, it has been a whirlwind week on the inter-webs!
My first three Clique Kits Design Team projects went live and I could finally share them! 
YAY!
So, stay until the end for a sneak peek of my layout for the New Varsity Team 
Introduction Blog Hop 
coming on October 1, 2015!! 
I will have a freebie for that day:) 


This was the September 19, Art Studio post over on www.CliqueKits.wordpress.com
You can follow this link if you didn't get to read it :)
https://cliquekits.wordpress.com/2015/09/19/art-studio-i-love-diy-layout/


The Sept. 21, 2015 Geek Lab post featuring exclusive printables and cut files from www.CliqueKits.com 
Used my new Silhouette Cameo to cut the exclusive files...I LOVE them!
See the rest here,
https://cliquekits.wordpress.com/2015/09/21/geek-lab-ck-exclusive-printables-modern-geo-layout/


September 25, 2015 Yearbook 6x8 Project Life.
All the cards are from the exclusive journal card and printables from the October Funfetti Clique Kits kit!

Super sweet!
See the rest here,
https://cliquekits.wordpress.com/2015/09/25/yearbook-6x8-project-life-album/


Here's the sneak peek of what's coming on October 1st, 2015
for the Design Team Blog Hop at www.CliqueKits.wordpress.com


Will hopefully see you here and there on October 1st!! 
Yay, can't wait!


Thank you.

Friday, September 18, 2015

Week In The Life™ 2015 Completed Wednesday Pages

Yay! Love this project so much!
Yes, it takes effort, but everything worthwhile does.
Here are all of my Wednesday pages.


Page 1: Week In The Life 6x8 Digital Templates2 by Ali Edwards--LOVE!


Pages 1 & 2:Used Crate Paper "Confetti Line" star printed vellum in place of the transparencies you got if you preordered Ali's Week In The Life™ kit early... Not to self, order early next year! Letter stickers in white say "cozy" over the photo of my son in bed.


Pages 3 & 4: Made a template for these 3x8 Morning, afternoon, and evening cards in Pages on my Mac so I can just fill it in for all the other days, and print.


Pages 3 & 4 with insert flipped over: just added the gray thin stripe because I like the yellow, gray, and aqua colors together. Printed out all the "What gives us comfort at home" answers from family. 


Close up: love the labels and wood veneer words from the kit.


Close up of the Acetate 3x4 cards from Pinkfresh Studio in my Clique Kits Design Team package. Used another Snap Photo Flip Pocket sized 3x4 to adhere the acetate card and the plastic 4 from Ali's kit over the photo of our Pomeranian. :)


Page 5 & 6: Highlighted the word Wednesday with Hero Arts Pool ink and a label stamp, stuck the packaging sticker on the yellow striped card, and called it done. Now on to Thursday!!


Thanks to Ali Edwards for this amazing concept and kit, and inspiration!
Thank you visitors for joining me here today!